Pages

Tuesday, 27 February 2018

Planner itch & my week #8

I have a confession, I haven't really been using my planner recently.  I know, I know, what's wrong with me right?  I had been in my Van der Spek custom organiser for two years when I started to feel planner itch, that little nagging feeling that it was time for a change, for something new or different.  So I moved into my rose gold Saffiano and set it all up but I still wasn't happy.  I wasn't using my planner to plan so eventually I just started writing things down in a notebook or in my TN and adding reminders to my phone calendar instead. 

My spring themed planner

I was stilling feeling the itch and unsettled so I decided to go through my planner collection and pick out one to start using again properly.  I was drawn towards my white Webster's Colour Crush planner, it seemed fresh and springlike so I filled it with flower prints, my favourite paperclips and my new Ultimate Success Planner inserts hoping to get my mojo back and for the first time in ages I felt inspired!

My week #8

I grabbed my washi tape and stamps and set about planning my week!  It was half term so I didn't have too much going on, it was a nice easy week for me to dip my toe back into the planning water so to speak.

Close up

Having decorated my pages I enjoyed using my planner again throughout the week, I was more inclined to open it up and check my to do lists and reminders and that helped me stay on top of things.  I am feeling much more organised now!  I have even planned this week too!

Close up

Do you ever feel planner itch or is it just me?

Thanks for stopping by!


Monday, 26 February 2018

Artline Monday - World Book Day

Did you know it is World Book Day this Thursday?  I love to read, give me a spare half hour, a good book and a cup of tea and I am in my element!  Reading opens up whole new worlds to people and can take you on all kinds of different adventures which is why World Book Day is important to me.  I thought for today's post I would share with you some activities you can do with your children to celebrate this special day!

Make some bookplates

Lots of children are being asked to dress up for World Book Day and to take their favourite books into school, make sure these treasures aren't lost by labelling them.  I brought a pack of 30 plain white sticky labels for 50p and we had lots of fun making our own bookplates over the weekend.

We made some pink and blue galaxy themed labels using a couple of Artline poster markers, a sponge, some Artline pens, glitter glue and an xclamations stamp.

Sticky labels, Artline poster markers & a sponge

We dabbed the two poster markers next to each other on a dry sponge.

Adding the colours to the sponge

Then dabbed the sponge all over the sticky labels.

Dabbing the paint onto the labels

After the paint dried we could write, draw and stamp on top of it.  Here are some of our bookplates!

Our bookplates

My girls also made a few labels on their own using lots of Artline products, it certainly kept them entertained for quite a while and now we have lots and lots of stickers for our books!

Making more labels

World Book Day rock

I wanted to do a little something to make someone smile this World Book day so I made another of our #ArtlineRocks to hide.  I used a few Artline 853 OHP markers to draw a book and cup of tea and added some steam with a paint marker.  We are going to hide this somewhere near our library and hope it will be found by someone else who loves reading!  If you want to have a go at rock painting with your children make sure you check out my previous posts for some tips and ideas!

World Book Day 2018 rock

Visit your local library

This week is the perfect time to stop by the library and pick out some new books together.  Even the smallest library can hold hundreds of books to choose from so you should be able to find something you will enjoy.  If you aren't already members take a look at your council/library website to see what paperwork they will accept to sign you up for a card before you go.

I hope you have a fabulous World Book Day and find some time to dive into a good book, I am planning on cracking open an old favourite and re-exploring The Shire and the rest of Middle-earth!

Friday, 23 February 2018

Planner Friday - February

It's Planner Friday again over on the Trendy Twine blog, please pop over and take a peek!

I know it is only the end of February but I am already daydreaming of spring!  I can't wait to see flowers blooming and feel the sunlight warming my skin again, winter feels like it has lasted at least six months!  With this feeling in mind I have swapped planners into a white binder and I am filling it with lots of florals and fresh colours to keep me going until spring actually does arrive. 


Journalling cards & paperclips

I have added some journalling cards and a few of my favourite paper clips into the pockets of my planner and they make me smile each time I open it up!  The positive quotes on the journalling cards are going to help me through the last days of winter and they are nice and handy if I want to document anything on them in the meantime.

I continued the spring theme onto my planner pages this week using lots of lovely Annie's Paper Boutique products.


Products used:
Choose Happy stamps
Used but not pictured:
Trendy Page Dots
Journalling cards
Paper clips

I am really happy with how they turned out!  I love how clean and tidy they look because of the APB stamps and I matched my ink colours to the washi tape and Trendy Page Dot reinforcements just to pull it all together.

You can see my spread and read the rest of my post here.

See you again soon!

Monday, 19 February 2018

Artline Monday - Quick journalling

Sometimes journalling can feel like hard work.  It isn't always easy to think of things to write and it can become just one more task you have to complete instead of a way to reflect on and record your day.  Last year I came across a quick and easy method to record my feelings in my travellers notebook that I want to share with you today.  It is called My year in pixels and once you have created your layout journalling will only take you a couple of minutes each day.

Quick journalling with my Artline pens

The great thing about My year in pixels is that you can use it in any kind of journal or diary.  It is perfect for bullet journals, notebooks, TNs and planners so whatever system you use you can give it a go!  You can also start it at any time of year so you don't have to wait until January rolls around again.

Draw a grid 31 x 12 squares

The first thing you need to do is draw a rectangle, I have found grid or dotted paper is the easiest to use for this but if have plain paper you can measure it out with a ruler.  Make your rectangle so you have 31 boxes by 12, you can do this either vertically or horizontally it is up to you which way you prefer it.  I drew mine on dotted paper so I used a ruler to join all the dots together to give me a proper grid.  

Each small square or pixel in the grid represents one day, label the 12 squares with the months (so if you want to start journalling today start with February and label through to January) and the 31 squares with 1 through to 31.  If your boxes are quite small like mine you might want to just label every 5 days like I have done as it's hard to squish all the numbers in.  For the months that have less than 31 days in them cross out the extra boxes or use some skinny washi tape to cover them up.  You should then be left with 365 days to colour in.

Journalling key

The next step is to create the key for your pixels.  Choose six different colours and label them with sets of feelings.  You want the feelings represented by the same colour to be similar to each other so for example you shouldn't make happy and sad both the same colour otherwise when you look back at your journal you won't know if you had a good or bad day.  I have split my six colours into two sets of brilliant and happy feelings, two sets of okay and fair to middling feelings and two sets of sad and anxious feelings.  I think these sets cover all of my emotions so they work well for me.  If you usually have more happy and upbeat days than sad or upset days (yay!) then you will want more colours that represent positive feelings and less for the negative ones. 

When I used this system last year I coloured the squares in with pencil crayon but I found as time went on the crayons looked wishy-washy and I wrinkled the paper by colouring harder to make the colours brighter.  This year I am using my Artline200 fineliners as the nibs are nice and small for the boxes and the colours really standout on the pages.

You can decorate the blank spaces on your pages if you want to, I used some washi tape and stickers but you can paint, draw or doodle on them if you are more artistic than me!

My year in pixels

Now you have set up your yearly grid all you need to do is take some time each evening to reflect on your day and then choose a colour that most represents how you have been feeling.  Once you have decided use that colour to fill in the pixel for the day and you are done!  It takes up so much less time to journal this way but you still get a record of how your year has been.

So does this way of journalling appeal to you or do you prefer to write down how you have been feeling and what you have been up to each day?

Thanks for stopping by!


Monday, 12 February 2018

Artline Monday - Valentines Day memory keeping

I'm a big fan of Valentine's Day, it is nice to be spoiled and to spoil someone you love so I really enjoy the 14th February.  This year I am documenting the day in my bullet journal using my Artline pens and a few bits and pieces from my planning supplies.

Valentine's Day spread created with Artline pens

I started off by adding some strips of washi tape to my pages and then I used my pink Artline Stix brush marker to write "Valentine's Day" copying a font I found on Google.  I left myself space on the first page to write the date and a couple of quotes and doodles too using the brush marker and Artline 200 fineliners.

Some of my favourite love songs

Then I drew a box, using the grid markings on the paper as my guide, with a pink fineliner.  This space is for a list of some of my favourite love longs.  I'm a bit of a soppy romantic and I love singing along with these while I am home alone.  In fact I have the Moulin Rouge soundtrack playing at the moment and have just finished a rousing rendition of Come What May!

Valentine's to do list & films to watch

On the second page I have space to record memories of what made me smile that day and my to do list of things I need to sort out before Wednesday.  I also glued in a journalling card at the top of the page and used this to list some love themed films I could watch while my husband is at work during the day.  

The last section is for me to fill in the details of what we did to celebrate Valentine's Day.  I wrote the heading for this part with a pink Artline Supreme highlighter and then went over the top of it with a black finelinerThis is one of my favourite ways to create headings and titles in my bullet journal, it is so easy!

If you are interested in starting your own bullet journal check out my previous post for details on how to set one up or if you are already using the system please leave me a comment telling me how you are getting on with it.

Happy Valentine's Day!


Monday, 5 February 2018

Artline Monday - Making Valentines Day cards

Yes!  We made it through January!  February always feels like a much nicer month as it is so short and we have Valentines Day slap bang in the middle of it!  It is a month for love and showing people you care so for today's post I am sharing some ideas about how to make your own Valentines card for that special someone.

Card making supplies

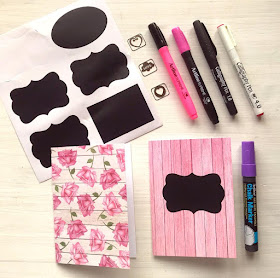
I brought a really pretty book of patterned card recently and a set of chalkboard sticker labels so I thought I would use these to make my cards along with a selection of Artline pens. 

Folding the cards

I removed pieces of card from the book and folded them in half to give me nice size greeting cards to work with.  I added a chalkboard sticker to the front of one of the cards and wrote on it with my chalk marker.

Artline chalk marker & chalkboard sticker

Using a chalk marker on a chalkboard sticker is a great idea if you are worried about making a mistake.  The chalk markers are more vibrant than using regular chalk and provide a better coverage too.  If you do make a mistake or just don't like how your message turns out the marker is easily removed with a slightly damp cloth.  Once it is dry you can try again until you are happy with it!

Artline calligraphy pen

For my next card I wrote a message on a journalling card using one of my Artline calligraphy pens.  Then I glued the journalling card onto the front of my Valentines Day card and added a couple of heart stickers to it as well.

Making one last card

I used another calligraphy pen for my last card and some milk and cookies stickers I have had in my craft supplies for a while now.  Because the stickers weren't very big I cut down the card to make it a bit smaller and then wrote "We go together like...." across the top.  

Here are how my cards turned out, I think they look quite sweet!  

Finished cards

Will you be sending or hoping to receive any Valentines cards this year?