Pages

Monday, 24 December 2018

Artline Monday - Christmas Eve craft

Christmas Eve is probably one of the most exciting days of the year so sometimes it is hard to get your young children to calm down especially in the evening.  I mean I don't blame them, I also get super excited about Santa being on his way but if you want to help them wind down a little before bed you could get them to make their own treat plate for Father Christmas.

There are two ways you can do this craft, either with a plain ceramic plate which you can keep to use each year (and it would make a lovely Christmas keepsake) or with a paper plate and it could become part of your Christmas Eve traditions to make a new one together each year.

Supplies for this Christmas Eve craft

If you are going to be using a ceramic plate you will need some of these pens for the design:

Artline Supreme permanent markers
Artline Supreme metallic markers
Artline 853 OHP pens
Artline 90 permanent markers

All of these pens work great on the ceramic surface!  We used a selection of them to make our own plate for Santa's treats.

Signing her name with the Artline 853 OPH pen

Summer drew Santa & I added the holly
 
All set for Christmas Eve

If you are using a paper plate then you can use any pens and markers and just get started designing them.  Here are some ideas Summer and I came up with last week...

Created by Summer age 7

My "a place for everything" plate design

Merry Christmas plate

Any festive scene or a drawing or message for Santa will be great.  The longer the plate takes to make the more time the children will have to sit still and relax so some helpful suggestions from you along the way could help to extend the craft! *wink wink*

I just want to take the time now to wish you all a very happy Christmas and I hope you have a wonderful time over the holidays!


Monday, 17 December 2018

Artline Monday - Christmas card craft

I can't believe Christmas is nearly here but there is still time to squeeze in another craft!  This week I have been making some sweet Christmas cards using my Artline pens.

Sheets of card, pens and markers

For this craft you will need:

  • Two sheets of card per Christmas card
  • A selection of Artline pens and metallic poster markers
  • Glue
  • Sequins 

The front of the card is quite simple because the inside is where we get really creative!  I drew a reindeer's face and antlers with baubles dangling off them using my Supreme brush markers and you can copy this design easily or come up with your own festive doodle. 

The front of our card

For the inside you will need your second sheet of card.  Fold it in half and then draw half a snowflake along the folded edge.  The snowflake is going to pop out of the card when it is opened so when you draw yours try to have two flat points which is where the flake will stay connected to the card.  I have marked mine with some small lines so you can see what I am talking about.

Draw half a snowflake

Carefully cut around the snowflake with either scissors or a craft knife.  Make sure you don't cut all the way around though, you want to leave your flat points alone which is another reason why I marked them out on mine.

The side you drew on is going to be the back of the inside of your card, open it out and gently pull your snowflake upwards so it stands away from the card.  You need to refold the line down the middle of the snowflake in the opposite direction so when you close the card it will shut with the flake sticking outwards instead of being flat inside it.

I coloured in my snowflake with a metallic blue poster marker and then I glued some sequins around it too.   Make sure you leave yourself enough room to write your season's greetings on the inside! 

Metallic blue snowflake

I opened up the card I drew the reindeer on earlier and coloured in a large section with my silver Artline 900XF pen and added some metallic pink and gold spots with my poster markers.  

Adding an extra touch of sparkle

Then I glued all around the edges of the reindeer card and stuck my white piece with the snowflake inside it to make one whole Christmas card.  Now when I open it up you can see my pop up snowflake with a nice silver pattern behind it for that extra touch of sparkle and festive fun.

Inside the card

I'm really happy with how the card turned out, I like how simple the front looks and then you get a nice surprise when you open it up!

Let me know how you get on if you have a go at making your own please, I'd love to hear about it!

Monday, 10 December 2018

Artline Monday - Christmas envelope art ideas

I love sending (and receiving!) Christmas cards, sometimes they are the main contact I have with some of my far flung family and friends over the year so I like to make them look as nice as possible before I send them out.  Last year I wrote about Christmas card calligraphy and this year I am building on that with some envelope art you can do to make your cards look extra special.  

All set for some envelope art

I have four different designs to share with you can today, some are quick and simple to do and others will take a little while longer.  It just depends on how much time you want to spend on them and how confident you are drawing on the envelopes.

Classic red and gold theme

My first design is a classic Christmas theme, I used my favourite gold Artline calligraphy pen to write the surname of my recipient and then drew some different styles of snowflakes in varying sizes with the Artline 900 and 999XF metallic pens.  I wanted to make the surname standout even more so I drew around it with my black fineliner to give it some depth.  Snowflakes are pretty easy to draw but if you don't know where to start you can copy mine or google "how to draw snowflakes" for some step by step instructions.  

If you don't want to write or draw directly onto the envelope with your pens (in case you make a mistake) you can do it lightly with a pencil first and then go over it in ink when you are happy with how it looks.  

Snowy theme

This second design can be done really quickly but I think it looks great!  I painted a layer of snow along the bottom of the envelope with a white poster marker and then drew two circles for the snowman.  I added some coal buttons, a hat, eyes and a smile with my black fineliner and a carrot nose, scarf and twig arms with my Supreme pens too.

I used the poster marker to write the surname of the family this card is going to followed by their address with the fineliner and then covered the rest of the space with falling snow.  I have left a small space clear for the postage stamp as I want to make sure it is stuck securely to the envelope when I send it.

Christmas decoration theme

The third design features lots of Christmas decorations dangling down along the top edge of the envelope.  I used my gold star stamper for a couple of the ornaments and then drew the rest by hand.  All the pens and poster markers I used to colour things in were metallic for that extra Christmassy feel!

After I had drawn all the decorations on this envelope I made a mistake on the name so instead of throwing it away and starting over again I adapted the design and corrected it by colouring around the name (and hiding my error) with the purple Supreme pen.  If you made a mistake take a minute to look at the envelope and see if you can think of a way to salvage it using the products you have.  If all else fails you could always stick a white address label over it and write on top of that instead.   

Fairy lights theme

My final design is my favourite one, I absolutely love fairy lights so I covered my envelope with a string of them.  I started off by drawing the twisted wire around the top and bottom edges and then added the light bulb shapes.  I chose traditional colours for the bulbs and coloured them in with my Supreme brush markers and a yellow paint marker.  I used the paint marker because the envelope is a grey/silver colour and I wanted the yellow to really standout against it.  I also used my metallic silver Supreme pen to colour in the bases that attach the bulbs to the wire.

After I wrote the surname I added an extra string of lights to make it look like the name was part of the wire connecting the fairy lights together.  The whole thing took me less than five minutes so you should be able to whizz through a stack of cards with this design in next to no time!

So have I inspired you to have a go at some envelope art?  I would love to see it if you do have a go!

Thanks for stopping by!


Monday, 3 December 2018

Artline Monday - Make A Gift Day

Today is Make A Gift Day so it's the perfect time to share another Christmas craft with you!  This time I am making a festive snow scene for my neighbour's daughter who is obsessed with dinosaurs but you can pop whatever you like inside yours and the method will be the same.

Gathering my supplies

For this craft you will need:

  • A clean empty jar with a lid
  • Some fake snow or white or silver glitter
  • Items to create your scene like small toys, pine cones or Christmas decorations
  • Artline 900XF metallic pens
  • A white Artline poster marker
  • A piece of foam or a small sponge

I found this dinosaur in the bottom of a toy box in my children's room, he looked a little worn and unloved so I transformed him with my metallic silver Artline 900XF marker and now he looks much better!


Colouring in the dinosaur toy

I wanted to make my pine cone look a little special too so I added some gold highlights to the tips of it.

Adding gold highlights

Unless you want to be covered in marker it is a good idea to set anything you have coloured in to one side and leave them to dry for a while.
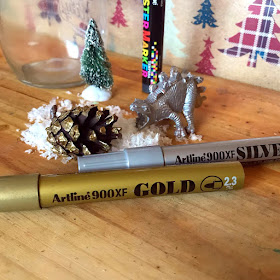
Waiting for the ink to dry

While they were drying I used the lid to draw a circle on my sponge so it would be roughly the same size as the mouth of my jar.  The sponge is going to raise my scene so it will be higher up in the jar than if I just glued everything directly to the bottom of the lid.

Drawing around the jar lid

Then I cut out my circle and painted the top of it white with the Artline poster marker so it would look a little snowy.

Painting the sponge

I used super glue to stick the sponge to the inside of the lid....

Gluing the sponge inside the lid

.... and then glued the tree, pine cone and silver dinosaur on top of the sponge.

Glue your items to the sponge to create your scene

I added some fake snow inside the jar, the amount you can see in this photo was too much so I had to take about half of it back out!

Add your fake snow, you'll need less than you think

Once the glue had dried and my figures were secure and in place I screwed the lid back onto the jar.
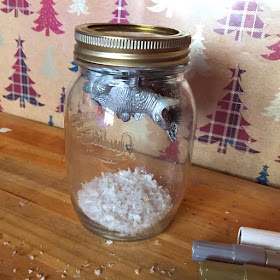
Screw the lid onto the jar

Flip the jar over and you have your snowy scene!
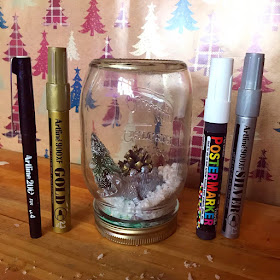
The finished snow scene

You can make these scenes with any size jar, from tiny mini ones to huge ones!  You just need to make sure whatever you glue to the lid will fit inside the jar and through the mouth of it before you start.  

If you wanted to make them into traditional snow globes you would just need to add some water and a spoon of glycerine to help the glitter float around.  You should also glue the lid shut so no one could open the jar again once it had been filled. 

Now I know how well the Artline 900XF metallic pens work on such odd surfaces I keep thinking of all the things I could use them on to make more Christmas decorations!  If I find anymore small forgotten toys I just might colour them in too, thread them with some ribbon and hang them on my tree!


Friday, 30 November 2018

Planner Friday - November

It's Planner Friday again over on the Trendy Twine blog and I am sharing my Christmas plans with you, please pop over and say hi!

I can't hold it in any longer, I'm so excited!  December is only a day away and then we can all get into the festive mood!  With this in mind I have been using my APB stamps to plan my perfect Christmas.  I want to get the lights, decorations and Christmas tree up as soon as possible and spend my weekends watching holiday movies with my children.  Though there is all that pesky shopping, wrapping and card writing to get through as well so I definitely need my planner to help me!


As usual I started my spread by adding some strips of washi tape along the top and bottom of my pages and then chose some coordinating Christmas Trendy Page Dots to reinforce the holes and add an extra splash of colour.


An extra splash of colour with the Trendy Page Dots

These pages are my monthly overview so I'm only adding the most important reminders and events to them, I will be recording everything else like housework and my regular to do lists (or the boring bits!) in my weekly pages so this is really just to give me an idea of how my month is shaping up so far. I also wanted it to look fun and festive so I'd feel a little tingle of Xmas excitement whenever I check my planner!


Cheers!


I've recently moved into an A5 sized organiser so I had plenty of room to add some fun decoration to my pages using stamps from the FoodiesDrinks & More and Perfect Pairs sets, after all it's the season of cocoa and cookies with the odd glass of fizz thrown in as well!

You can read the rest of my post here.

Thanks for stopping by!


Monday, 26 November 2018

Artline Monday - Mason Jar Christmas gift

Did you know that the 30th November is Mason Jar Day?  Well, I do love a little mason jar craft and as we're getting nearer to Christmas I thought I would share with you one of my favourite quick and easy gift ideas.

Supplies for my mason jar craft

You will need a mason jar (or a similar style jar), Artline poster and Supreme markers, hot chocolate powder, mini marshmallows, some sprinkles or chocolate buttons and a ribbon and gift tag. 

Before we begin you need to wash out your jar with some soapy water as we will be filling it with food and then leave it to dry completely.  When that is done you can start to decorate the outside of your jar.  I wanted to do a pretty snowflake pattern on mine so I started to draw this with my white poster marker.

Adding a snowflake pattern around the jar

When I was happy with how the design looked I added a few highlights with the Supreme metallic markers in blue, gold and silver.  They are quite hard to see when the jar is empty but they standout more once it is full.

Layers in the jar

I filled the jar in layers, the hot chocolate powder goes in first and should be about half of the contents.  Then you add mini marshmallows, the more the better and finally top the rest up with either chocolate buttons or sprinkles.

Decorating the tag

I carried on with the snowflake theme on my gift tag, drawing a large flake on the front and added some silver sparkle with the Supreme marker.

Writing my message

Then I wrote my message on the other side.  I used a white calligraphy pen because I love how white ink looks against kraft coloured paper and card and it matched the design I had drawn on the front of the tag.  You could also you the tag to write down the instructions for making the hot chocolate, 3 heaped teaspoons of powder mixed with hot water (or however many spoons the jar it came from says) and then generously top with marshmallows and chocolate sprinkles or buttons.

Finished with a bow

The last step was to thread the tag onto my ribbon and tie it around the top of the jar with a big bow.  

This really is a fun and easy gift to make, it is perfect for children to make for their friends or great for the chocoholic in your life!  As all of the ingredients are in an air tight jar they should last quite a long time, but if the recipient is anything like me this will be long gone by the start of the new year!

Please let me know if you have a go at making your own, I'd love to see it!


Monday, 19 November 2018

Artline Monday - Christmas planning countdown

Eeeeek there's only five weeks left until Christmas!  Have you started getting ready for the holidays yet?  If not don't worry, I can to help you with my handy Christmas countdown.

My Christmas countdown created with Artline pens

This is my Christmas bullet journal, I set it up last year and I use it for planning, lists and memory keeping.  You can find my previous post about it here if you would like to see how I use it for recording our holiday memories.  

This year I have planned out my timetable for getting everything ready using my Artline Stix pens and fineliners.  It starts today and has a checklist of things I need to do each week in the run up to Christmas. 

My checklist for weeks four and five

You might have already completed some of these steps or you might find it easier to do them in a different order so if you make your own list think about how to make it work for you.  I like to do as much as I can early so it is out of the way and then I can get on with enjoying the season so I might complete some of these steps before they are due but I have added them to the week I want to get them done by at the latest giving me some wriggle room.

Week five

This week I want to think about gift ideas (for the people I haven't already brought for), making sure I have all the postal addresses I need for cards and presents, checking when I need to order my Christmas turkey by and the date I can prebook my online food shop delivery and finally buy Christmas cards so I can get ready to start writing them.

Week four

I'm going to put my tree up and look for the best prices for the presents I want to buy.  I will get everything I need to wrap the gifts including paper, ribbon, sticky tape, bows and tags and I'll also work out how many stamps I need for my cards and buy those too.

Three weeks and counting

Week three

By this week I want to finish buying the presents and get them all wrapped and posted for the people I won't be seeing before Christmas. I will also get my cards into the post so they arrive in plenty of time for the holidays.  The last couple of things I want to do is start buying (and hiding!) the Christmas snacks and treats and look around for the best deals on the drinks we like too.

Week two

This week is the perfect time to visit friends and family as it is close to the holidays but not when everyone is crazy busy getting ready for the big day.  It is also when I will finalise my Christmas Dinner menu and before I buy half of the supermarket I want to make some extra room in the fridge and freezer.  At some point this week I'll want to do the BIG Christmas food shop so I will have everything we need apart from the fresh items that I will buy the following week.  There's one more thing to do, sort out some entertainment for while we are all home like DVDs and board games we can play together.

Week one 

Okay, for the last week before Christmas I just have a few things left to do.  They are do any food prep I can get out of the way early, collect my turkey and buy any fresh ingredients that I couldn't get before.  The finale thing I have on my checklist is to relax and enjoy the holiday, which I have to say is my favourite step!

I hope this helps you with your Christmas planning!

Friday, 16 November 2018

Recipe Diary 2019

Are you looking for a new planner for 2019?  Do you love to cook, consider yourself a foodie or know someone who is?  Well then let me tell you about the Recipe Diary!


The Recipe Diary*

As you can guess the diary contains lots of yummy recipes for you to try over the year and it is available in a range of beautiful covers so you can pick the one that suits you best.  There's even a special Mum's edition which has extra space for your kids timetable and activities, it makes me feel like a domestic goddess just thinking about it!


The full range of Recipe Diaries for 2019*

When Emma from the Recipe Diary contacted me she said I could select which diary I would like to review but it was a really hard choice!  I was torn between the aqua and gold Foliage one and the Pineapples.  In the end I went with Foliage and it really is stunning. 


Foliage

Okay, now let's look inside the diary!  The leaf print is continued and there's a storage pocket containing a sheet of stickers with lots of different icons for birthdays, appointments, anniversaries and more.

Pocket and stickers

There is a cover page for your details so if you loose or misplace your planner it can be returned to you.  Next is a yearly overview for 2019 and then some pages for your important phone numbers and information under the headings Personal, Health, Home and Travel.  There are sections for your contacts, useful websites, calendar dates (bank holidays, religious dates, when the clocks go forwards and back etc) and then there are two pages with the calendars for 2018, 2019 and 2020 which are great for forward planning and looking back. 

Cover page for your details

There really is so much packed inside this planner, from pages for you thoughts and plans, space to list the books you would like to read, TV shows and films to watch, places to visit and events to attend right through to pages for you to record birthday, anniversary and Christmas gifts so you won't buy the same person the same gift twice!  

Now on to the foodie bits!  There is space for you to note down your favourite meals and recipes, cook's hints and tips (meat cuts, storage times etc), recipes for quick dips, dressings, sauces and desserts, weight conversions and measurements, cooking times and metric conversions.


Week on two page layout

The next section is the main part of the diary.  The seven days of the week have equal space (which is my preference) and then there is a tasty recipe complete with a photograph to tickle your fancy and inspire you to get cooking!

Each day has enough room for your to do lists, reminders and appointments and the paper is nice and smooth giving it a luxurious feel.  The diary is A5 size so large enough for your plans but still lightweight and portable if you wanted to pop it in your bag.


Recipes to make your mouth water

The wirobinding is cleverly hidden from the outside of the diary and it makes the pages lay completely flat wherever you open the book.  This is great for when you are writing in it or if you are following a recipe in your kitchen.  Speaking of recipes, doesn't this Coffee Sponge with Ginger Cream look simply divine?  I think I am definitely going to have a go at making it!

The last few pages of the diary are for notes and thinking about the future with space for your thoughts and plans for the new year and a two page overview of 2020.  Finally there is a recipe index so you can quickly find which pages have ideas for breakfasts, main courses, cakes, drinks or desserts etc.  There is also a coordinating ribbon bookmark so you easily mark your place in the planner.

I have really enjoyed reading all the recipes in the diary, there's quite a few I would like to try and better still I think I can manage as they're not too complicated!  There's a bit of a running joke in our family about how I'm not the greatest cook and my youngest daughter always tells people she prefers her school dinners to my food but maybe, just maybe next year I can change her mind if I give these new ideas a go!

If you would like to buy a copy of the Recipe Diary it costs £9.99 and you can find them here.  If you would like to win a copy for yourself or as a gift for someone else make sure you are following me on Instagram and the Recipe Diary to so you don't miss our giveaway!

Thanks for stopping by!


* Disclaimer - Images marked with * are taken from the Recipe Diary website.  I was given this product to review free of charge and as always all opinions are honest and my own.

Monday, 12 November 2018

Artline Monday - World Kindness Day 2018

Tomorrow is World Kindness Day, one of my favourite days of the year!  The idea behind it is to make the world a brighter and happier place by committing small acts of kindness and spreading a little joy.  These acts can be random (also known as a RAK) or they can be for someone you know, how you choose to celebrate the day is up to you. 

I thought it would be nice to make some little cards with kindness quotes on them that I could hide for people to find, either in my children's school bags or somewhere out in the "wild" for strangers to discover.


Linen card and my Artline pens

I started with some lovely linen card and ripped it into smaller sized pieces using a ruler so I got a nice raw edge. I wanted to end up with something similar to the size of a business card or postcard or something in between the two.


Different sizes of card

Then I got out my Artline fineliners, bush pens and Supreme metallic markers and started writing the quotes. I mixed up the types of lettering and colours I used to make them look a little more fun and interesting and added some stickers and stamps for decoration.


Writing a quote

On the back of the cards I wrote World Kindness Day and the date 13th November 2018 so people would know what they were for and then they could search online for more details about the day and maybe commit their own acts of kindness too.


My little set of cards

I am going to put one in each of my daughter's bags tomorrow before school and I thought I'd hide the rest around my local community centre so they can be found and hopefully spread the message about World Kindness Day!

Will you be joining in with your own acts of kindness tomorrow?