Pages

Friday, 29 June 2018

Planner Friday - June

It's time for another Planner Friday over on the Trendy Twine blog, please pop over and say hi!

Hello!  Welcome to Planner Friday!  I'm Amanda from She's Eclectic and I've been the resident planner girl here on the Trendy Twine blog for the last four years.  I stop by once a month to show you how I use my APB stamps to get organised and to pretty up my planner pages!

As it will be July soon I spent some time this week setting up the monthly overview in my travellers notebook.  I like being able to see exactly what I have going on each month all in one quick glance and the stamps are so much neater and easier to read than my handwriting!


One of the things I love about the APB stamps is that they work in so many different size planners!  They fit perfectly in A5, personal, pocket and mini size Filofaxes, all sizes of Travellers Notebooks and planners like Erin Condren's and the Happy Planner.  Over the years I have swapped and changed my planners, organisers and journals but I have kept on using my APB products as they are so versatile.

I have recently switched to B6 size and this gives me enough space for my notes and reminders without being too big or bulky for me to carry around daily.  I started to plan my month by adding a strip of washi tape along the top edge of the pages and matched my inks and pens to the colours of it.

Then I used some practical stamps from the School DaysAt Home and Title It sets to record things like clubs, field trips, the last days of school, bills, errands and planning sessions.  I also used the Brain Dump stamp from the Title It set in the long space next to my calendar on he left so I can record any random information and reminders as and when they come to me.

Once I had added in all my plans I decorated some of the free space using the sun stamp from the How's The Weather set, a couple of fun quote stamps from the Choose Happy set and some sweet coffee stamps from the Need Coffee set because if I'm going to survive a sweltering hot summer then I'm going to be drinking iced coffee all day, every day until autumn!

You can read the rest of my post here.

Thanks for stopping by!


Monday, 25 June 2018

Artline Monday - Monday motivation

Do you hate Mondays?  I know a lot of people really dread this day of the week and we could all use a little #MondayMotivation sometimes so I thought I'd show you how I try to embrace the worst day of the week in my bullet journal.

Monday motivation in my bullet journal

I use my bullet journal to get organised and as a kind of art journal,  I create my own planner spreads for each day and month and then add doodles and sketches when the mood takes me.  You can see how I set mine up here if you are a BuJo beginner or if you would just like a peek inside in my notebook.

I like to have a positive quote or two to start the week with, looking at Monday as a new beginning instead of something negative helps me face the day in a better mood.  I chose a couple of bright Artline Supreme brush markers that remind me of summer days and fields of buttercups to write this quote so every time I open my bullet journal I will be greeted by something cheerful!

Bright & cheery - Artline Supreme brush markers & fineliners

The second page of my spread is where I plan my day.  As Monday is the start of a new week I have a section for my weekly goals and the things I need to get done that day.  Some of the tasks are simple but I write them down anyway for two reasons, one is so that I don't forget to do them and two is because checking things off my list gives me a little fizz of satisfaction that is definitely needed on a Monday!

I have another section to keep track of my fitness and well-being, back in January I said I wanted to increase my daily move goal and get more exercise so this is where I record how I am doing each day.  Seeing the figures in black and white (or in this case green and cream) helps me focus on my goal and motivates me to keep going those extra few minutes or distance.

My plans for Monday

Tips for a better Monday 

  • Do as much as you can on Sunday evening to prepare for Monday morning, having your outfit, shoes, bag and other bits you need already to hand on Monday morning helps the day start smoothly and with less stress.
  • Wake up early enough to have a relaxed breakfast and fuel up for the day ahead.
  • Wear your favourite clothes, colour or scent to cheer you up. 
  • Make plans to do something you love after work or school, whether that is spending time at home with a good book or meeting friends for some fun.
  • Think of Monday as a fresh start and try to keep things positive.
  • Read my Artline Monday posts.
  • Smile, it will soon be Tuesday!

Do you have any ideas to help increase Monday motivation?  Let me know in the comments below so I can give them a go too!

If you want to see more of my bullet journal posts and spreads you can find them all here.

Have a great Monday!


Monday, 18 June 2018

Artline Monday - Plans for the summer holidays in my bullet journal

I started counting down the weeks until the summer holidays some time ago, I just can't wait for the schools to break up and to have my children home with me!  We are going to have so much fun whatever the weather is like (but I'm crossing my fingers for lots of sun!) so I thought I'd jot down a few ideas in my bullet journal to keep me going until they begin. 

My summer plans made with Artline Stix & fineliners

I split my pages into two sections, things to do on rainy days and things to do on sunny days and then I used my Artline Stix brush pens and Fineliners to create this spread.  The Stix brush pens are great to use for larger cursive writing and pairing them with the much smaller nib of the fineliners makes a nice contrast and my lettering look more interesting.

I don't actually mind the occasional rainy day over the six weeks, especially if I don't have to leave the house.  It's quite nice to curl up on the sofa with the kids and watch a film or read a book together.

We also have lots of board games packed away for wet and windy days, our favourite is Pay Day but if we have a lot of time to kill then we get out Monopoly.  Splashy the Whale isn't really a board game but it's still lots of fun if you don't mind getting squirted with water!

Summer fun on rainy days

My girls enjoy doing all kinds of arts and crafts when we are stuck inside, the last time they were off and it rained a lot we painted some #ArtlineRocks and made lots of colourful pompoms.

My youngest daughter still loves to build forts, I give her blankets, sheets and pegs and she will cover the room until she is happy with her creation.  I sometimes think she will be an architect when she grows up as she makes different areas and rooms inside the fort like bedrooms and reading corners.   

If we have to go outside in the rain then we will wrap up warm, put on our wellies and grab the giant umbrella to keep us dry or just the wellies and jump in the puddles, it's still fun to do even as an adult!

Summer fun on sunny day

I am looking forward to the sunny days the most though, I love spending time outside with the kids!  This summer we are going to go rock hunting and explore new places we haven't been before.  We will pack a picnic and take our dogs to the forest near us and have an adventure, I'm picturing some kind of Famous Five story but without the smugglers or crooks!  Oh and definitely no ginger beer, I really don't like that!

Long sunny days were made for barbecues so we will be having quite a few of them over the summer.  My favourite thing about a BBQ is that my husband does all the cooking and I am just on salad making duty while the children play football or tennis or their own version of cricket which no one really knows the rules to or how to win!

I really enjoyed creating this spread in my journal, it was lovely to spend some time day dreaming about the holidays and then using my pens to write and doodle all my plans.  Putting pen to paper makes them all feel more real and within reach, I hope the next five weeks go by quickly! 

If you are interested in setting up your own bullet journal then take a look at my Bullet Journal Basics post to get you started or if you'd like to give hand lettering and calligraphy a go then read this post for some ideas.

Have you started making any plans for the summer yet?


Wednesday, 13 June 2018

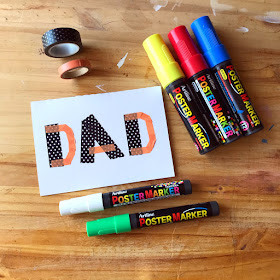
Kids crafts with Artline - Fathers Day card

As it is Fathers Day this weekend I thought for today's post I would show you a quick and simple way for your children to make a Fathers Day card!

Supplies

All you will need is a piece of card, some washi or masking tape and a few Artline poster markers in different colours.

The first step is to fold your sheet of card in half so it looks like a greetings card and then use pieces of tape to mark out the word Dad on the front of it (or Father or Daddy, just make the letters smaller for longer words).  I used two different thicknesses of tape to make it look a little more interesting but you can use just the one if you like.  It doesn't matter if the tape is patterned or plain as we will be removing it once the card is finished. 

Use tape to spell out the work Dad

Once you are happy with how the word looks it is time to start painting.  Use the poster markers to colour over the front of the card.  Do one colour at a time and then let the paint dry between each new colour.  These poster markers dry quite quickly on cardboard so you only need to wait a couple of minutes   

Colouring in with the poster marker

You need to colour in the whole front section of the card including over the top of the washi or masking tape until you are left with something like this.

Completely covered

You can skip this step if you like but I added some polka dots over the top of the paint with my white poster marker and then left it to dry for a couple more minutes.

Adding polka dots

The last step is to very carefully remove the tape from the front of the card.  If any of the paint still seems wet when you try this put it to one side and leave it a little while longer before you try again.  

Remove the tape

And here is our finished card!  If you pair it with a big bar of dad's favourite chocolate then you will be on to a winner this Sunday!

The finished card

My favourite thing about this technique is that it is almost mess free, there's no painting hands or feet to make prints of them and there's no brushes to wash up afterwards.  Just put down a sheet or two of newspaper to protect your tabletop and you are good to go!

Thanks for stopping by and have a great Fathers Day!


Monday, 4 June 2018

Artline Monday - Summer rocks with Artline

Is it raining where you are?  I feel like we've had nothing but rain for weeks and we have been stuck inside, dreaming of summer!  As it was half term and my girls were home with me we decided to make some summer themed #ArtlineRocks to distract us from the weather and for us to hide at the beach when next go.

I scream, you scream, we all scream for....

One rainy afternoon last week we divided up the rocks I had left over from our previous rock painting adventures and I got out our Artline pens.  We find these ones work the best on stones:


Because our rocks are white they didn't need a base coat, if you have darker coloured rocks and stones then it is easier to give them a coat of paint before you start so you have a lighter surface to work on.  

Painting the sea with a poster marker

My youngest decided to paint the sea on her first rock and a lovely bright yellow sun.  When it was dry she added some details using the Artline 853 OHP pens and a white paint marker for the waves.

The sun and sea, how I miss them both!

I had a bit of an odd shaped rock to work with so I turned it into a ice cream cone.

Drawing the cone

I drew the outline with a black 853 OHP marker and then coloured it in with yellow and white paint markers.  

I used these pens for my ice cream rock

When the paint had dried I added raspberry sauce with my pink Artline Supreme marker and the waffle pattern to the cone with an orange 853 OHP pen.

Kick your flip flops off!

My eldest daughter drew a pair of flip flops on her first rock and wrote a fun message on it!

Strawberry and blueberry ice cream

My youngest thought my vanilla ice cream was boring so she drew her own with strawberry and blueberry scoops instead!

I love ice lollies

She also made this I love ice lollies rock, it's a little abstract looking but she really enjoyed drawing it!

Can you dig it?

Our last rock has a bucket and spade on it, my eldest girl painted the sand with a yellow paint marker and then drew the rest with the 853 OHP pens. 

Written on the back of each rock

On the back of each rock we have written #ArtlineRocks, share online, keep or rehide so anybody who finds one will know what to do with it.

Our full set of summer rocks

Here is the full set of our summer themed rocks!  I am going to varnish them this week and then put them away until our planned trip to the beach.  

Tips for hiding rocks at the seaside

If you are going to make your own rocks and are thinking about hiding them at the seaside here are a few tips for you....

Do not hide your rocks on the sand.  If the sea comes in too far then your little work of art will be wash away and may never be seen again!

You could hide them on the wall along the beach if the weather is good and the sea is calm.  


Hiding rocks on rocks!

If there are rocky walkways or piles of rocks near the beach but not the water then these are great places to hide your stones if you want them found quickly.  The brightly painted rocks standout beautifully against the natural stone!  If you want to make finding your rocks a little trickier then try hiding them up higher instead of low to the ground.


Standing out against the rocks

Some other good places you can hide your rocks are parks, cliff tops, benches and the ornamental gardens and flowerbeds that are usually spotted around beaches and seaside resorts.  I like to hide stones among the flowers and as long as you have varnished them they will still look great when someone finally spots them nestled in there.

Please let me know if you decide to make some of your own #ArtlineRocks, I would love to see them!