Sunday 30 August 2015

My week #34

I have always loved colourful bunting, I mean it is even in my blog logo so when I saw this bunting washi tape I thought it was perfect!  I paired it with my new weekend stamp and used the colours from the tape for everything else on my pages.

My week #34

I didn't do a lot of decoration this week as my to do lists and reminders were so colourful but they made me feel cheerful each time I peeked inside my planner! 

Close up

Close up

Products used this week:
Cloudy Cow tassel charm

Sorry this is just a quick post today, I am trying to catch up with everything.  My week #35 pages should be up soon!


Wednesday 26 August 2015

Kawaii Box giveaway!

Did you see my Kawaii Box review on Sunday?  Well as I mentioned I have been given another box to give away to one of you!  All you have to do to enter is complete the steps below and you could win your own box of super kawaii goodies! 


Good luck!

 a Rafflecopter giveaway


Sunday 23 August 2015

Kawaii Box reviewer of the month - July 2015

Hello!  Today I want to share with you the cutest subscription box!  I first heard about Kawaii Box last year when Mrs Brimbles reviewed a box for them and I thought the products she received were adorable so I bookmarked the website and added a box to my wishlist.  


I recently contacted the Kawaii Box team and applied to be the reviewer of the month and happily they agreed and sent me my own box of goodies to show you.   

How pretty is this packaging!?

The boxes are shipped straight from Singapore and mine only took nine days to reach me here in the UK (from shipping notice to delivery).  There are a few different subscription options to choose from including a one off box, three month, six month and twelve month subscriptions and the shipping is free so you only pay for the box or boxes you receive!  You can find all the options and prices here.    

Just as pretty inside too!

Inside the box everything is wrapped in a piece of tissue paper and there is a thank you card which lists all the products.

So sweet!

Look at it all!  It's too, too cute!  Some of the pieces were wrapped in their own clear packaging so I have opened them up to show you properly.   

All the stationery pieces

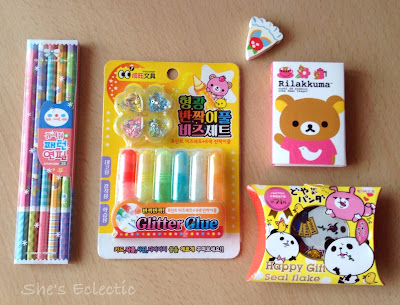
There were quite a few stationery bits in the July box, lucky me! I think the pencils are very pretty and who doesn't love a bit of glitter glue and sparkly things?  The eraser is sweet, I love Rilakkuma so the sticky note book is brilliant and I haven't brought any new sticker flakes in a while so it will be nice to use these ones.

Sweets and more

I also got a bag of Kracie DIY chain candy, the most adorable alpaca keychain, a mini plush mushroom, pretty pastel bracelet, kawaii toast coaster and a squishy doughnut mirror.  I have to admit, I wasn't sure what the toast shaped coaster was at first.  I thought it was cute but I had to look on the thank you card to see what it was for! 

Rilakkuma sticky notes book

This is the Rilakkuma book folded out so you can see all of the sticky notes inside it.  I think I will smile each time I use one!

Flake seal stickers

Here is a selection of the sticker flakes, aren't they fun?

Soda and grape flavour candy

It's not every day you try a Japanese candy and find it's shaped like your initials, the pieces look like A's and C's to me!  You can link the sweets together to make your own candy bracelet or just eat them, whichever is more fun for you.  They kind of taste like fruity gum and it was nice to try something new.

Everything together

This is everything all together, each Kawaii Box contains between ten and twelve items.  I got eleven in mine and I think it was a fab selection.  I am struggling to pick a favourite item because I love quite a few of them!  

Arty desk shot
notebook not included

So what did you think of the Kawaii Box?  If you loved it make sure you check back here next week as the lovely people at Kawaii Box have given me a box to give away to one lucky reader!  


*Disclaimer - this product was provided free of charge for the purpose of this review.  As always all opinions are honest and my own.  The links in this post are not affiliated and I have not been paid to write this review.


Friday 21 August 2015

Planner Friday - August

Planner Friday is where I show you which products I use to create my weekly themes over on Twine it up with Trendy Twine!  

Hello!  It feels like the last Planner Friday was absolutely ages ago but it has only been a month, I guess lazy summer days make everything seem longer!  Anyway I was really excited for today's post so I created a fun and happy theme to share with you, it is very colourful.


Assorted Inks


I based my whole week around the new Weekend Banner Planner Stamps, I think they are great for highlighting the weekend section of your pages and they look so pretty! .....

You can read the rest of my post here.

Thanks for stopping by!


Wednesday 19 August 2015

My week #33

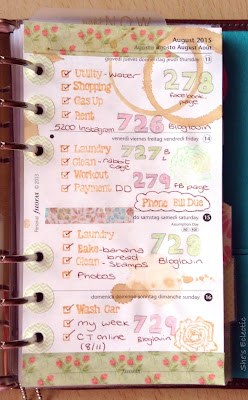
After all the fruity and tropical themes I have done recently I felt like a change so I went for a vintage look this week.  I saw a photo a while ago of a diary spread that had coffee stains as part of the design and I wanted to give it a go myself.  

My week #33

The lady who inspired me had used a template for the stain marks and stamped them in with ink but as I didn't have the template I just brewed up a strong cup of coffee and got to work!  I flicked and splashed the coffee onto my blank pages and then used the bottom of a tea cup dipped into the coffee to make the rings.  Once the pages had dried completely I used them as normal.  I also blotted off most of the ink from my rose stamp before I used it to create a more faded image.  

Close up

Close up

Products used this week: 
The rose sticker is from the K & Company Flora and Fauna die cut sticker set
but this is discontinued now and the rose stamp was from 
one of my Linky's boxes which are also
discontinued.

Doing the coffee marks free hand means they aren't perfect but I still kind of like how they turned out.  What do you think? 


Tuesday 11 August 2015

My week #32

I will be honest with you, I hate the taste of watermelon and anything watermelon flavoured is even worse (Jolly Rancher I'm looking at you!) but I thought this washi tape looked cute so it fell into my basket.

My week #32

This week has been a bit crazy for me, I was listed as one of the 12 Instagram planning gurus to follow for organisation inspo by Reyna Cazares from Brit + Co!  I was so shocked!  And very, very pleased of course!  I have been walking around with a big smile on my face all week!

Close up

Close up

I didn't have any watermelon stamps or stickers to use with this week's theme so I just cut out some of the slices from the washi tape and used them instead.  I think it worked better than if I had tried to draw them myself. 


Products used this week:

Monday 10 August 2015

My week #31

This post is very late!  I received my Van der Spek custom organiser on the Tuesday of this week and moved into it straight away, then I didn't want to show you my pages in it until I had written a separate post to share my love for my new, perfect planner which delayed my usual schedule.

My week #31

I used my Lorabailora summer stamps again this week with matching pineapple washi tape, I love how tropical they look together.  This pineapple stamp comes in two parts so I could use a green ink for the leaves and then a yellow one for the main part of the fruit and join them together into one image.  I've been having a lot of fun using decorative stamps in my planner instead of stickers for a change.  The flamingo stamp I used in my week 30 pages came from this set too, I was very lucky to find a collection that had two of my favourite things in it! 

Friday 7 August 2015

My Van der Spek custom organiser - a planner love story

My planner love story begins with an unassuming, plain box.  Well, I say it begins with the arrival of the box but to be honest it really started when I received my leather samples from Van der Spek a few weeks back.  As soon as I felt the quality of the leather and saw the colours available I knew I would fall pretty hard for my custom planner once I had designed and ordered it! 


Van der Spek custom organiser

I talked about what I wanted in my workhorse post, a binder with large rings, that would be hard wearing on the outside with a pop of colour on the inside and this beauty is what I ordered! 

My perfect planner

The outside leather is ciocolatto (6202), it is a lovely warm shade of brown and it feels incredibly soft and luxurious.

Inside

The inside leather is turchese nappa.  I hadn't ordered a sample of this originally as it wasn't available as an option but as soon as Petra announced the new colours I had to see what it was like compared to turchese (19) so I requested a sample.  It is the perfect shade of turquoise and I preferred the texture of the nappa leather so that is what I picked.  I went with the standard pocket configuration, six card slots on the left hand side, a small pocket and two full hight slip pockets.  On the right there is another full hight slip pocket and a slightly larger pocket.  The pen loop is elasticated so it will take a chunkier pen which is great!

Giant 30mm rings!

The 30mm Krause rings feel very sturdy and well made.  I can't get over how big they are!  I thought they would be a similar size to the ones in my Webster's Pages Colour Crush planner but they are larger and hold quite a bit more.

Full width back pocket

I added a full width back pocket to the organiser, I thought it would be handy for keeping any import letters or paperwork safe while I needed them or before I filed them away properly.

Contrasting stitching

With the custom organisers you are given the option to select the colour thread used.  I wanted contrasting colours so the turchese thread is used on the ciocolatto leather and the ciocolatto thread is used on the turchese leather.  You can see how perfect the stitching is in this close up!  I also love the little Van der Spek tag which is sewn inside the binder.

All moved in

I moved everything in as soon as it arrived, I am still tweaking my set up a little but it is working well for me so far. 

Here are a few more photos for you...


I really can fit my whole life in here!

Pockets, pockets, pockets!

My pen matches the nappa leather perfectly

I think I have found "The One"!  I didn't really believe in planner peace before, mainly because no one ever seems to find it for long but I'm hoping I have found it and it stays because this is the perfect one for me!


Monday 3 August 2015

Introducing Inkly Moments

During National Stationery Week I reviewed the Inkly Cards app as part of my post for write a letter day.  Inkly lets you design cards and postcards and personalise them too.  Their unique selling point is some clever technology that allows you to take a photo of your handwritten message for inside the card and then recreates your greeting as if you had written the card yourself.  The app is free to download on iTunes and Android and it has just been updated with a fab new feature.  

Inkly Moments is a photo editing tool that allows you to add stickers, text and filters to your pictures and share them on social media or save them to your device.  This feature is free to use and unlike some similar apps you don't have to pay for any extras, they are all available to everyone. I hate it when I get a new app and then find all the cool bits are offered as in app purchases and only the basics are free! 

I picked some of my favourite photos and had a play....


There are all kinds of stickers to choose from, for children,


Family,


Inspirational quotes,


Pets and much, much more!

There are also lots of little doodles you can add like the hearts,
bunting and flower I used in these pics.


If you can't find a the perfect sticker for your photo you can 
simply add your own text and choose a font 
like I did for this pic of my 
youngest daughter nestled
among the flowers and long grass
in my garden.

Just like the card section of the app Moments is very easy to use.  You can create your own photos in minutes and share them with your friends and family.  I really enjoyed going through my old photos and making something new!


Here are a few of the different editing screens, you can
also adjust the brightness, contrast, blur,
exposure and saturation
within the app.

So if you fancy having a go at designing your own moments you can download Inkly here and have some fun!

I will leave you with this one last photo I made as it's Monday....


Thanks for stopping by!

*Disclaimer - I am not affiliated with Inkly and will not receive any money for this post