Showing posts with label Kawaii. Show all posts

Monday, 28 January 2019

Artline Monday - Cute bookmark craft

February is fast approaching and with it comes the first half term break of the year and it is also Library lovers month so I thought I would combine these two things and show you a bookmark you can make with your children over the holiday and then maybe you could visit your local library and take out some books to read together (using their fab new bookmark too, of course)!

Rainbow cloud bookmark

To make this cute page marker you will need:

  • Two pieces of paper
  • A piece of thin cardboard
  • Scissors and glue
  • A black marker like my Artine 70 pen
  • pens or markers in rainbow colours


The first step of this craft is to take one sheet of your paper and cut it into a square, mine is 6 x 6 inches but you can go a little bigger or smaller.  You can use plain white, coloured or patterned for this part, it really doesn't matter.  

Once you have your square it is time to start folding it, copy the steps pictured below.

6 x 6 inch square

Bring two diagonally opposite corners together to form a triangle and run your finger along the fold.

Triangle

Keep the folded edge at the bottom and bring the right corner up to the top centre point.

Fold right corner up to the top centre point

Then repeat this step with the left corner so you are left with a diamond shape.

Fold left corner up to the top centre point

Unfold both corners back down so you end up with the triangle shape again.

Unfold corners to make a triangle again

Take one side of the paper from the top centre point and fold it downwards towards the bottom edge of the triangle.  Leave the second piece still pointing upwards.

Fold top centre point down to the bottom edge

Then take the right bottom corner and fold it upwards again, like we did to make the diamond shape before.

Bring the bottom right hand corner upwards again

Fold the excess from the bottom right hand corner (that we have just brought upwards again) down into the pocket we are creating.

Tuck the excess into the pocket

Do the same with the left hand bottom corner....
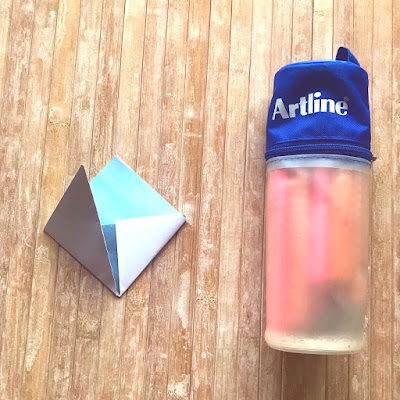
Bring the bottom left hand corner upwards again

... and tuck the excess inside the pocket again.

You should now have something that looks like this

Now you have your basic bookmark and it's time to decorate it! 

Place your bookmark onto your sheet of card

The bookmark sits on the top corner of the page you want to mark so make sure you turn yours around so the pocket is at the top (see the photo above).

Place your bookmark onto the sheet of card and draw a cloud shape around the top half of it, the cloud needs to be just slightly bigger than the pocket.  

Cloud shape

Remove the bookmark and finish drawing the cloud, then add a smiley mouth and a pair of eyes and cut out the cloud carefully with a pair of scissors.

Glue the cloud onto your bookmark

Glue the cute cloud shape onto the outside of the pocket of your bookmark.

Cloud bookmark ready for it's rainbow

The last thing you need to do is make the rainbow.  Take your second sheet of paper and cut out a square of it that is a little bit smaller than the bottom of your cloud.

Rainbow coloured pens and markers

Grab your Artline colours and fill the whole square of paper with stripes of red, orange, yellow, green, blue, purple and pink.  

Drawing the rainbow

I placed a piece of scrap paper under the square I was colouring in so I wouldn't get any paint or ink on my desk and then I could go right up to and over the edge without making a mess. 

All the colours of the rainbow

Once the rainbow is finished all you need to do is glue it onto the bookmark.

Gluing along the top edge of the rainbow

Place the glue along the top edge of the rainbow and then stick it to the underside of the cloud shape on your bookmark.

Ta-da!

When the glue has dried your bookmark is ready to use!  I think it looks so sweet perched on top of the pages of our book! 

Our finished bookmark

Now you know how to make the base of this bookmark you can design your own creation to add on top of it, how about a rocket shooting out flames or a silly face?  All you need to do is fold your paper into the pocket shape and then draw whatever you like on a piece of cardboard instead of the cloud to make something new!

Thanks for stopping by!


Tuesday, 18 September 2018

Happy Cute Surprise Bag review and giveaway

Have you heard about Happy Cute It is a website that sells the sweetest products, from stationery to plushies, squishies, homeware and accessories plus so many things in between so if you like cute and kawaii things you should definitely go and take a peek at what they have to offer!  One of their products is a Surprise Bag which I have been sent to review for you today and if you would like to win one for yourself then fill out the widget at the bottom of this post to enter!

Happy Cute Surprise Bag

The Surprise Bags contain at least 15 items which are selected at random from the HC warehouse and cost approx £14.50 each including free shipping or if you want your parcel to arrive a bit quicker you could pay extra for a faster service.


Reverse side of the bag

The products come in a nice little drawstring bag which is chock-a-block full with goodies so let me show you what was in there!

Sweet box, purse, plushie & bead making kit

There was just so many things inside this bag that I loved!  The mix of products was good too, there were practical things like purses, socks and pocket mirrors as well as fun things like hair accessories, keychains and plushies.  The bead jewellery making kit provided an afternoon of crafting fun for my girls and they also nabbed the hair bow, clips and hair ties from me too!  

There were 15 items in my bag which means they all cost less than £1 each which is a real bargain!

Mirrors, hair accessories, keyrings, socks, bracelet & plushies

My absolutely favourite product is the rainbow alpaca, I have wanted one of these for such a long time so when I found this at the bottom of the bag I might have let out a little squeal!  It is all of my favourite things, pretty, plush, pastel and practical because it is a purse as well as a cute toy!  There is also a slot on the back to hold a bank card or travel pass and the key ring on the top is attached to an extendable cord making it super handy.

Okay, so if this bag is right up your street then pop your details below to enter the giveaway!  The more actions you complete the more entries you will receive!

She's Eclectic Happy Cute Shop Giveaway

If you have any questions about the bag let me know and I will try and help, oh and good luck!


Tuesday, 10 July 2018

Kawaii Box review and giveaway

Hello!  I feel like it has been absolutely ages since I have done a Kawaii Box review and giveaway so I am really happy to be sharing this with you today!  If you like what you see then pop your details in the widget at the bottom of the post to be in with a chance of winning a box of your own *wink, wink*

Fun new design

If you haven't heard of Kawaii Box before then let me tell you a little about them!  The boxes are sent directly from Tokyo to your door and they are filled with 8 to 10 super cute items ranging from sweets to stationery and plushies.  It will cost you approx £15 for a one off box with free delivery or if you want to treat yourself regularly then the price of the box goes down when you subscribe to a 6 or 12 month plan.  

Okay, now let me show you what was in mine!


A box full of cuteness!

Oh my gosh, it's all so sweet! 

Information booklet

Each Kawaii Box comes with an information booklet that tells you about all the goodies you have been sent.  It is really nice to learn a little something about why each item was chosen to be included and how you can use them if you're not sure what to do with them.

Candy, hair tie, highlighter, pen, nail stickers & squeeze toy

I shared out the bag of watermelon sweets between my children as I'm not a big fan of anything melon flavoured and they all loved them!  My seven year old has claimed the set of doughnut hair ties for herself but the syringe highlighter, flamingo multi-pen, nail stickers and squeeze toy charm are all mine!

Cupcake kit, plush, stickers and washi tape

There was also a cupcake kit, some Hello Kitty washi tape and a Gudetama (the lazy egg) plush and pack of stickers in the box.  I have never heard of Gudetama before but my eldest daughter has so she asked for the toy and stickers as she thinks he is adorable!

It's so SQUISHY!!!

The Mochi squeeze toy is meant to look like a traditional Japanese rice cake treat, it is a bit plain but it's so squishy, I just can't stop playing with it!

Let's make cupcakes!

I wanted to try the DIY whipped cream cupcake kit so I checked out the handy tutorial on the Kawaii Box blog and then had a go at making my own creations.

My cupcakes and desserts

It was really fun making these miniature desserts!  The instructions online were easy to follow and now my girls dolls can enjoy some cupcakes and treats!

Pink, pink, pink

As a stationery fan I absolutely love this flamingo pen, it looks very sweet!  I painted my nails pink to match it and then used the cute nails stickers to really kawaii-fy the look.

My kawaii nails

Pink, glitter and unicorns... oh my!  All my favourite things!

If you want to win a Kawaii box for yourself then you can enter here!  The more steps you take the more entries you will get.

Tuesday, 15 May 2018

New Japan Candy Box - Review and giveaway

Hello!  I've got some exciting news for you today, Japan Candy Box have recently turned three years old and to celebrate they have redesigned and updated their boxes of treats!  They have sent me one of the new boxes to review and are going to give away another box to one of you too!  Pop your details in the widget at the bottom of this post for your chance to win.  Okay, now let's see what's new and what is inside this month's box!

Fab new style box

The boxes have a fresh new design and the address label is now on the reverse side so it doesn't hide any of the logo or images, just in case you wanted to share a pic on Insta without hiding your personal details!  The biggest change is on the inside though!

New information booklet

The old boxes used to come with a postcard inside which listed the contents but didn't give you any information about the products.  Now you get a super-duper booklet that is jam packed with illustrations of each item along with their names, details about the flavours and some facts about them too.  

Useful info about the products

Each box now contains 10 Japanese candies and savoury snacks and has a wider variety of products than ever before. There will be more exclusive and limited edition treats like Japanese Kit Kats, seasonal Pocky and Hi-Chew sweets too!  A one off box costs $19.90 USD which is about £14.70 or 16.70 Euros and that includes worldwide shipping .  If you subscribe to six or twelve monthly boxes you will get them for a lower price and you can find all the information about that here.

Some of my yummy treats

My box has a Japanese exclusive dark chocolate Kit Kat, a bag of Meiji peach flavour gummy sweets, Koikeya BBQ corn snacks, Tomica Ramune candy and Tohato caramel corn snacks.

There was also a Popin' Cookin' Kuru Kuru Takoyaki DIY candy kit, a pot of Kabaya chocolate puddings, a box of Strawberry Pocky, a Yaokin Umaibo corn snack and a bag of Kasugai rose flavour candy.

DIY candy kit and more

Out of these my absolute favourites are the Meiji peach gummies, the Tohato caramel corn snacks and the Kasugai rose candy, they all taste so good!  My children also tried everything and their favourites are the strawberry Pocky, Kabaya chocolate puddings and they loved the peach gummies too.  My husband loves dark chocolate so he took the Kit Kat and gives it two thumbs up!

Taste testing!

We haven't had a go at making the DIY candy kit yet but we've always had a lot of fun when we have done them before so I'm sure we'll enjoy it!

On to the giveaway!  It's easy to enter, just fill in the sections below to be in with a chance of wining a box of treats sent directly to your door!  Or if you just can't wait you can treat yourself to a box here (but still enter, you might win another one!).

She's Eclectic Japan Candy Box Giveaway

Good luck everyone!

Thursday, 3 August 2017

Blippo Surprise Kawaii Stationery Bag review and giveaway!

If you love kawaii things as much as me be prepared to swoon over this Surprise Kawaii Stationery Bag I was sent by the awesome people behind Kawaii Box and Japan Candy Box!  

Unlike the Kawaii Boxes and Japan Candy Boxes I have reviewed before, these goodie bags are not a subscription service so you can treat yourself if and whenever the mood takes you.  Items are selected randomly from the kawaii warehouse and you receive at least 15 super cute stationery items in a sweet drawstring bag.  I'm picturing the warehouse as some kind of pastel pink wonderland where bunnies hop around gathering your stationery bits and pieces who then hand them off to some other adorable woodland creature who packs and ships your order, if I am wrong please don't correct me!

Okay, are you ready to see what was inside my bag?

Surprise Kawaii Stationery Bag

By a stroke of luck my bag has a few cat and Hello Kitty products which I love, I think the bookmarks are my favourite out of everything I received!  There is also a set of pencils with lids, a sharpener and eraser, a pack of highlighters, five sheets of stickers, a ghost family gel pen, a set of deco tapes, carrot shaped erasers, sticky notes and a holographic card. 

So much cuteness!

Exclusive Blippo bag filled with stationery

Sweet stickers and cat bookmarks

The bags cost around £12.80 (depending on the exchange rate) and shipping is free to most countries including the UK, Europe and the USA which is fantastic!

If you like what you see and want to order a bag right now here is the link for it or if you are feeling lucky follow the steps in the gadget below to try and win one in my giveaway.  The more actions you complete the more entries you will have in the draw!

She's Eclectic Blippo Giveaway

Good luck!


Saturday, 1 October 2016

My week #37

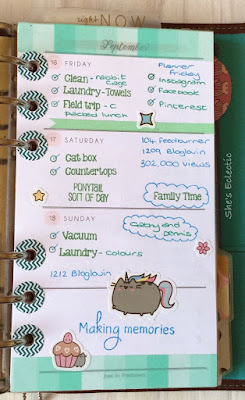
If you have been reading this blog for a while then you will know I love anything kawaii so when I came back to decorating my planner pages I knew straight away I had to use these Pusheen stickers on my layout.

My week #37

Ever since Facebook introduced stickers for their messages I have been a little obsessed with the flying, rainbow, unicorn, kitty Pusheen.  It's all of my favourite things combined! I have one more of these stickers that I am going to keep forever and never use, yes, I am a sticker hoarder!

Close up

Close up

Do you ever buy stationery and then not use it (unless you have doubles) or is it just me?

Thanks for stopping by!


Wednesday, 8 June 2016

My weeks 17, 18 & 19

I have been in a bit of a planning funk for the past few weeks, I haven't decorated my pages or used any stamps, coloured ink or washi tape!  I think it was a combination of feeling a bit meh, being busy and also ill.  I was still using my planner but I was just scribbling things down in pen and generally making a big mess while trying to keep all of my plates spinning.

I also didn't feel up to blogging so I have three weeks worth of pretty pages to show you that I did before the funk set in.

My week #17

Week #17 was National Stationery week so I had to keep the decoration down to a minimum as I needed lots of space for all of the blog posts I was writing and the daily themes.  I think I did 11 posts over 7 days which was a bit crazy!  I kept my pages bright and cheerful with washi tape and small stickers but as you can see the reminders and to do lists were my main focus for this week.

My week #18

My week #18 pages had a super kawaii theme with Hello Kitty stickers, sweet foodie stamps and washi tape.  Things were quite quiet for me so I had a lots of space to play with which was nice after my previous week!

My week #19

I think my week #19 pages are one of my favourite weeks ever, anyone who has been following my blog for a while will know that I am a sucker for an Alice in Wonderland theme!  This one was based around the Mad Hatter's tea party and I just love how it turned out!  

I think this may have started my planning funk though!  When I began decorating my week #20 pages I just kept thinking they looked a bit rubbish compared to week #19, in the end I didn't even finish them and it all spiralled from there.  So I have decided to shake things up a little now!  I have been sent some samples from Just So Stationery of a week on two page vertical layout and I am going to give them a go and see how I get on.  I think a change will help me get my groove back!

Thanks for stopping by!