Monday 25 February 2019

Artline Monday - Tooth Fairy Day

Thursday 28th February is Tooth Fairy Day, who knew?  The tooth fairy is very special so she definitely deserves her own day to celebrate all her hard work and I thought it would be nice to do something to mark the occasion.


Scrap fabric and Artline pens

I've tried lots of tooth fairy crafts over the years, tiny notes, fairy dust and special milestone cards and messages etc but I've never made a tooth pillow before so I wanted to give it a go today.  I'm also feeling a bit inspired by the return of the Great British Sewing Bee so I broke out my cotton, pins and needles!

I decided to upcycle a couple of bits of old baby clothes to make the pillow.  I used my Artline fineliner to mark out the pieces of cloth I needed and then cut out two squares of stripy pink material to make the pillow and a smaller strip of white fabric to make the pocket which will go on the front of it.   


Personalising the pocket

I am making this pillow for my youngest daughter as she still has plenty of milk teeth left to loose.  I thought she would like me to personalise it for her so I decided to decorate the pocket with an Artline fabric marker before I pinned and stitched it into shape.

Pinning the pocket

I used a simple running stitch to sew the pocket together and added a little strip of pompoms along the top edge too.

I also attached the pompoms along the edges of my stripy pink material for the body of the cushion and then pinned and stitched three of the sides together leaving one side open to fill with stuffing.  Then I sewed the personalised pocket onto the centre of the cushion again using a running stitch.

Sewing

Using the end I had left open I filled the cushion with lots of stuffing and then closed the edge with some small, neat stitches. 

Adding the stuffing

Here is the finished pillow, it is now ready to hold a little lost tooth when the next one falls out (which according to my daughter could be any day now!).  I also think it might help the tooth fairy do her job as a mini cushion must be easier to find in the dark, under a pillow with a sleeping child on top of it than a tiny tooth on its own, don't you think?

All set to hold it's first tooth


Does the tooth fairy still visit your house?  How much does she leave your children?  I don't care about inflation, in our house if you loose a tooth she leave a pound coin.

Thanks for stopping by!


Monday 18 February 2019

Artline Monday - Half term craft

Are you looking for something to do to keep your children busy this half term?  I have an idea for you today that is fun and easy and best of all you probably have the supplies you need to make it already at home!

My youngest daughter loves llamas and she is really happy that they have become popular recently so when I saw this idea for paper plate llamas on Pinterest I knew we had to give it a go!

Supplies

You will need:

  • Paper plates
  • Scissors
  • Glue or sticky tape
  • A ruler
  • A selection of pens & poster markers for decoration

Take your paper plate and draw a line down the centre of it with your ruler, then cut the plate in half.

Cut your plate in half

Put one half of the plate to one side, this will be the body.  Take the second half and draw the head and neck of your llama, don't forget it's ears too.

Draw the head and neck

Take the other half of your plate and turn it over so the bottom of it is the side we will draw on.  Glue or tape the neck underneath the body of the llama.  

Attach the head to the body

Using the piece you cut the head out from draw four legs and a tail and then cut them out.

Draw four legs and a tail

Glue or tape these to the llama....

Attach the legs and tail

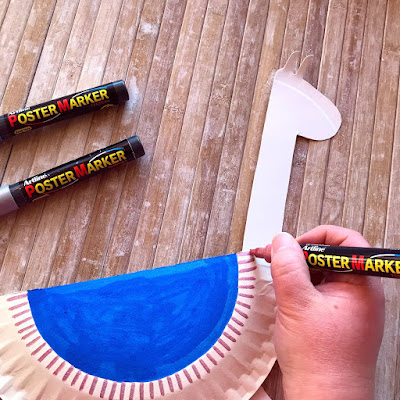
... then it is time to decorate and add some details!  I used the circle of the bottom of the plate as a guide for my blanket shape and then painted it blue with my Artline poster marker.  

Adding a blanket

Once the blue had dried I added some metallic pink tassels with another poster marker.

Drawing the tassels

Next I drew an eye, nose, mouth and a set of reins on the llama, I also coloured in the inside of the ears with a little bit of pink, added a few eyelashes and some more tassels around the reins.

Adding some details

The great thing about Artline poster markers is that you can draw over the top of them once they have dried properly so I added some silver spots to my blanket too.

Silver spots

Here is my finished llama!

My llama

My daughter was also making her own one following the steps as I made mine.  She raided my Artline supplies and decorated her llama all by herself.

Painting her blanket

She is really pleased with the llamas and she wants to carry on making more over the holiday so she can decorate her room with them.  I thought I could peg them onto some string for her to make a kind of bunting or display once she's finished making an army of them!

Our paper plate llamas

My favourite thing about this craft is it isn't messy and my seven year old can complete all the steps herself so now she knows what she is doing I can go and make myself a nice cup of tea while she toils away making more on her own.

Do you like the current llama trend?  If they aren't your thing you could try different animals instead if you adjust the shape a little.  I'm thinking horses or maybe even unicorns?  I might give that a go and see how they turn out!

Thanks for stopping by!

Monday 11 February 2019

Artline Monday - Valentine's Day cards

Following on from last week's Valentine's Day gift this week I'm sharing a couple of ideas for making your own cards.  

Card making supplies

My first card is pink and girly but you could change the colours to something you prefer.  I started out with an A4 sheet of card and folded it in half.  Then I glued a smaller piece of patterned card in the centre leaving me with a pink boarder.

Plain and patterned card

I glued an even smaller piece of white card on top of the patterned sheet giving me a nice layered look.

Making layers

Next I added a cute mini envelope and wrote Hugs inside along the bottom of it with my Artline fineliner....

Mini envelope with message

... and then doodled some more messages as if they were coming out of the envelope.

Doodling

I used my fineliner and metallic Artline Supreme marker to draw some hearts and add a couple of finishing touches which you can see in the final photo on this post.

Girly card

I wanted my second card to be a bit more "manly" so I went with darker colours but again you can change them to suit your tastes.

Colouring in the lace

I had some white lace stickers so I stuck a couple of strips of them onto the card to give it a bit of texture and then painted over it with a metallic silver poster marker.

Message on the front

I used an Artline Supreme brush marker to write Happy Valentine's Day on the front of the card.  Then I added some blue highlights to my lettering with a metallic blue poster marker and drew a couple of hearts in the corners too.

My finished designs

Once you have finished making your cards all that is left to do is to write your messages inside them!  I will leave that totally up to you but I always like a cheeky poem that makes me laugh.

See you again soon!


Friday 8 February 2019

Planner Friday - February

There's a new Planner Friday post over on the Trendy Twine blog today!

Hello!  I am Amanda from She's Eclectic and I am the resident planner girl here on the Trendy Twine blog.  I love to use my APB stamps to help me stay organised and to add a bit of fun to my planner pages too.  As next week is Valentine's day I have gone all out with a "romantic" theme full of hearts and things that go together perfectly so let me show you how I did it!


Products used: You & me planner stamps

The first thing I always do is to add washi tape wherever I can fit it in on my spread, usually along to top and bottom of the pages.  Then I pair that with a set of trendy page dots which reinforce the holes and protect my pages from tearing as well as adding a lovely splash of colour! I do this before I write or stamp anything so I know exactly how much space I have to work with.

Next it is time to get practical with the Check it offAt homeMore at home, and School days stamp sets!  I use the Check it off stamps to create my to do lists and then I use the other sets to add my reminders and things I need to complete like doing the recycling, paying bills and running errands.  They also cover things like events, appointments, assemblies and after school clubs.

If you want to just get organised you can stop here, you have made your plans and now you just need to work on finishing them but if you want your planner pages to look really pretty as well as being practical then there is one more stage left to do, decorate them!


Decorating with image stamps, washi and trendy page dots

I use my APB image stamps to create my designs and a few stickers here and there.  For this week I used the You & mePerfect pairs and We go together stamp sets to add sweet little couples that compliment each other like coffee and doughnuts and eggs and bacon.  Then I coloured them in to match my Valentine's Day theme using lots of pink!

You can read the rest of my post here.

Thanks for stopping by!


Monday 4 February 2019

Artline Monday - Valentine's Day gift

I love February, it means January is finally over and we are a step closer to spring!  It is also the month for love and romance because of Valentine's Day so for today's post I'm going to show you a little handmade gift idea for the 14th that you can do with your Artline pens. 

Supplies

I brought this hanging glass decoration from Home Bargains which can be used to hold an electric tealight candle or to plant a small succulent or something similar but if you can't find one of these you could use any kind of glass decoration, wine glass or candle jar etc to personalise.

Artline make lots of pens that work on surfaces like glass and ceramic, for this craft I am using poster markersSupreme metallic markers and an Artline 900XF gold pen.

Drawing a gold heart

You can't get away from hearts in February so I decided to go with the flow and add lots of them to my decoration!  I drew a large gold heart first....

Adding a red heart with a poster marker

.... and then a smaller one inside it with my red poster marker.

Spots and dots

Next I added some spots and dots to my pattern with the white poster marker and my metallic markers.

More hearts

I wanted to continue the heart theme so I drew lots of small hearts all around the decoration in gold, white and silver and then I added some more detail onto the red heart in the centre using the white poster marker again.  

Adding the year to my star charm

I decided to commemorate the year this was made so I painted my little wooden star charm gold using the Artline 900XF pen and when it had dried I wrote 2019 on it with a black marker.  Then I threaded it onto the twine so it would sit on top of the bauble.

My finished design

If you wanted to really personalise your gift you could add names or initials, important dates and places that are special to you both to your design as well.

The view from above

The front

I think it's nice to receive a handmade gift for Valentine's Day, especially if it is something that will last a lot longer than a bunch of flowers or a box of chocolates.  I like to have something I can keep and treasure.

If you are in the mood for love you can check out some of my previous Valentine's posts here for some more ideas!

Thanks for stopping by!