Monday 30 July 2018

Artline Monday - World Friendship Day

Did you know today is World Friendship Day?  It is the perfect time to reach out to your friends and let them know just how much you appreciate them!  Of course you can do this by text, email or message but how much nicer would it be to send them a card or letter and surprise them through the post?

I recently brought some lovely linen card so I thought I would use it to make my own greeting cards for my friends and show you a few different designs you could have a go at yourself.


Rustic edges

The card I used is A5 size so I folded it in half (top to bottom) and then tore it along the crease using my ruler.  Then I folded my two separate pieces in half again (side to side this time) to give me the basic shape of my cards. 

I attended a workshop a while ago with an amazing man who makes his own bespoke cards and he said that he prefers a rustic edge on his pieces so I thought I would try to do the same with mine.  I placed my ruler against the edge of my card leaving a small slither uncovered and tore it off along the ruler.  I repeated this process along both sides of the cards and used the raw edge from when I ripped the A5 card into two as the top.  I left the bottom edge as it was so the cards would have a stable base to stand on.  If you don't like the rough edges then use scissors to cut your card down to size instead.

Okay so now we have the basic card shapes let me show you my designs!

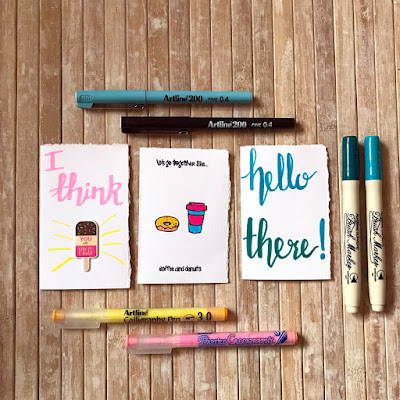
Hand lettering with my Artline Supreme brush markers

If you are confident with you lettering skills or just want to have a go then why not write a message on the front of your card?  If you are worried about making a mistake have a few practice goes so on some scrap paper before you move onto the card.  I love my new Artline Supreme brush markers so I selected my two favourite colours and wrote "hello there!" on mine.  Take your time writing each letter and remember to put more pressure on your downward strokes to make those lines thicker.  

Hello there!

My second card is a little easier than the first one.  I went through my sticker collection and found this fun ice lolly one which says "You are FAB" on it.  I used a pastel pink calligraphy pen to write "I think" above the sticker but if you don't like using calligraphy ones then you could use a regular nibbed pen like Artline Supreme markers as they are a nice thickness and come in a lot of bold colours.

If you can't find a sticker you want to use then you could look for a journalling card with a meaningful message on it to glue to the front of the card instead.

Adding the finishing touches

To make the lolly stand out and to add a little more colour to the card I used a yellow calligraphy pen draw a few lines around the sticker which I think is the illustrative equivalent of shouting TA-DA!

I think you are fab!

My last card is for people who love to doodle or have some cute image stamps they can use.  Mine says "We go together like.... coffee and donuts" and has a sweet little illustration of a tasty donut and travel cup of coffee.

Colouring in with my fineliners

I coloured in the images with some Artline 200 fineliners which are really vibrant against the white background and perfect for adding small details like the sprinkles I drew on top of the donut.

We go together like....

Once you have made your card or cards you just need to write something inside to tell your friend/s how awesome they are and why you are happy they are in your life!

My cards

I think World Friendship Day was invented by Hallmark as way of selling more cards but it is a really nice idea!  So if you make your own you are still sharing the love and it feels a lot more personal than a store brought card too. 

Who will you be sending a card too?

I would love to receive some happy mail in the post so I hope these cards bring a smile to my friends faces when they arrive!

Happy World Friendship Day!

Have a wonderful World Friendship Day!


Friday 27 July 2018

Planner Friday - July

Who's ready for another Planner Friday?  Please pop over to the Trendy Twine blog and check out my latest post!

It's finally summer and the schools have broken up for the holidays here in the UK!  I am all set for fun in the sun, days out and lots of adventures which I want to document in my cute little travellers notebook and Annie's Paper Boutique have the perfect stamps to help me do it!


Products used: Choose Happy stamps
Used but not pictured: Mini calendar card

I wanted to create a spread I could fill in whenever something memorable happened during the break so I got out my stamps and planning essentials and set to work!


My summer holiday spread

I started with a strip of washi tape along the top of the page and then added a sweet mini calendar which I filled in with the dates for August.  I am going to use this to record any important dates during the month and the week my husband has booked off work.

I used stamps from the Documenting The Everyday #1 & #2 sets to make sections for my memories and stories so now I have space for Family Time, So Fun, Time With Friends and room for my favourite photo I take over the summer.


Creating sections

I stamped my kraft tag-it with the Details stamp from the Documenting The Everyday #2 set and glued it next to the place I had made for my photo so I can write about when and where the picture was taken and why it is important to me.

You can read the rest of my post here.

Thanks for stopping by!


Monday 23 July 2018

Artline Monday - National Parks Week

Yesterday saw the start of National Parks Week, if you haven't heard about it then it is a week of fun and events taking place at the National Parks we have here in the UK and it has inspired my latest collection of #ArtlineRocks!

Rocks and Artline pens

I know that not everyone is lucky enough to live near one of our amazing National Parks so if you can't get to one to join in with the celebrations then you could go and spend some time outside in either a local park, forest or wood and enjoy getting in touch with nature.  With this in mind my rocks are based around things you can do in the park or any wide open space.


Adding a base coat

Because the rocks I am using are quite dark I started off by giving them a coat of paint with my Artline poster markers and then put them to one side while they dried.

Working on the rocks

On my first rock I drew a picnic scene because picnics are one of our favourite things to do together as a family.  I don't know why sitting on a blanket outside to eat a meal makes it more fun but it just does!  


Enjoy a picnic at the park

I used poster markers, Artline 853 OHP markers and a yellow paint marker to draw a sandwich, strawberries and a cupcake on a picnic blanket and the green base coat looks like grass.

Painting a red base coat

The second thing we like to do in big parks is to explore nature.  We go on nature walks and see what animals and insects, plants and flowers we can find.  I usually take a notebook or two and my Artline pens and we record and sketch our findings on our adventure.  If you head outside this week maybe you could do the same?

I had a large flat rock that just screamed ladybird to me so I used a red poster marker to give it a base coat and then added the insects features with a black Artline 325T water colour marker and a white poster marker for the eyes.

Explore nature

When the weather has been a little more forgiving than it has been recently there are usually lots of lovely flowers dotted around the parks.  My girls and I love to walk around them and enjoy the colours, shapes and scents so for my third rock I painted a daisy using my poster markers again and the Artline 853 OHP pens and a paint marker.

Look at all the pretty flowers

Parks and open spaces are great for playing games!  Football, tennis, rounders and cricket are lots of fun with friends so I drew a ball on my fourth rock!


Play a game with friends

My last rock was inspired by Marry Poppins, let's go fly a kite!  Now I'll be honest, I've never successfully managed to get a kite in the air whenever I have tried but it's quite funny watching my children run up and down with string trailing after them trying to launch one!  And who knows, maybe one day we'll get one flying!


Let's go fly a kite

These rocks have just been varnished and are sat on the side drying so they will be ready for us to hide in the next day or two.  I'm planning on taking them to a couple of parks around Birmingham this week so keep your eye out if you are in the area!


My park collection of #ArtlineRocks

Can you see who has invaded my picnic rock?  It's a little ant looking for a treat!

I do hope you get to spend some time enjoying the outdoors this week, especially as the weather is so nice at the moment!


Monday 16 July 2018

Artline Monday - Thank you teacher

It's the final few days of the school year!  Have you sorted out a thank you gift for your little one's teacher yet?  Don't worry if you haven't, I have a quick and simple idea to help you out!

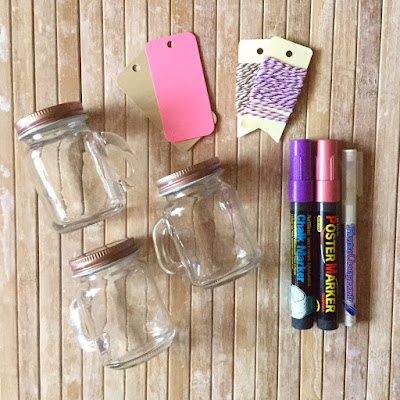
I think most teachers end up leaving school on the last day of term with a lot of flowers and chocolate so I wanted to do something a bit different.   I found these sweet little mini mason jars in Home Bargains but looking online they have something similar in Hobbycraft, Wilkinson, Amazon and Ikea too so you should be able to get hold of some. 


Mason jars, tags and Artline pens

I wanted to fill the jars with sweets, for the first one I used mints and humbugs and matched these with a kraft card gift tag and brown and white twine.

This colour combination is great for male teachers!

I attached the twine to the tag and then used my white pastel calligraphy pen to write Thank you on the front of it.  I really like how the white ink pops against the kraft colour!  On the reverse side of the tag you can write your message to the teacher and your child's name.

Writing the tag

The last step was to tie the gift tag around the top of the jar and then screw the lid on.

Attaching the tag

Of course you could use full size mason jars for this but I think the mini ones look really cute and after the sweets have all been eaten the recipient can use them for stationery storage like paper clips and rubber bands or as a tealight or votive candle holder.  Or just refill them with more treats!

Finished gift

For the second jar I went with a red, white, pink and silver theme.  I used a metallic red poster marker to write on the gift tag and added some pink and white twine to attach it to the jar.

Filling in the tag

I wanted to make this jar different to the first one so I used a silver Artline 900XF pen to write Mrs R on the front of the jar (one of my daughter's teachers) and then tied the tag to it.

Personalising the jar with the teacher's initials

Here is the finished jar!

Personalised thank you gift

I used a chalkboard sticker for the last jar and one of my Artline chalk markers.  It was easier for me to write on the sticker before I put it on the jar but as the chalk markers are erasable I could have wiped out any mistakes and tried again if I hadn't.

The chalk markers are nice and bold

I filled this jar with some purple and red sweets....

Ready to add the treats

... and then tied a piece of purple and white twine around the top of the jar into a bow.

Finished jar

These gifts are so easy to make but I think they look really cute and it's always nice to receive a handmade present!

My thank you gifts

Which of these is your favourite design?  I can't decide, I hope my daughter's teachers and classroom assistant like them on Friday!


Tuesday 10 July 2018

Kawaii Box review and giveaway

Hello!  I feel like it has been absolutely ages since I have done a Kawaii Box review and giveaway so I am really happy to be sharing this with you today!  If you like what you see then pop your details in the widget at the bottom of the post to be in with a chance of winning a box of your own *wink, wink*

Fun new design

If you haven't heard of Kawaii Box before then let me tell you a little about them!  The boxes are sent directly from Tokyo to your door and they are filled with 8 to 10 super cute items ranging from sweets to stationery and plushies.  It will cost you approx £15 for a one off box with free delivery or if you want to treat yourself regularly then the price of the box goes down when you subscribe to a 6 or 12 month plan.  

Okay, now let me show you what was in mine!


A box full of cuteness!

Oh my gosh, it's all so sweet! 

Information booklet

Each Kawaii Box comes with an information booklet that tells you about all the goodies you have been sent.  It is really nice to learn a little something about why each item was chosen to be included and how you can use them if you're not sure what to do with them.

Candy, hair tie, highlighter, pen, nail stickers & squeeze toy

I shared out the bag of watermelon sweets between my children as I'm not a big fan of anything melon flavoured and they all loved them!  My seven year old has claimed the set of doughnut hair ties for herself but the syringe highlighter, flamingo multi-pen, nail stickers and squeeze toy charm are all mine!

Cupcake kit, plush, stickers and washi tape

There was also a cupcake kit, some Hello Kitty washi tape and a Gudetama (the lazy egg) plush and pack of stickers in the box.  I have never heard of Gudetama before but my eldest daughter has so she asked for the toy and stickers as she thinks he is adorable!

It's so SQUISHY!!!

The Mochi squeeze toy is meant to look like a traditional Japanese rice cake treat, it is a bit plain but it's so squishy, I just can't stop playing with it!

Let's make cupcakes!

I wanted to try the DIY whipped cream cupcake kit so I checked out the handy tutorial on the Kawaii Box blog and then had a go at making my own creations.

My cupcakes and desserts

It was really fun making these miniature desserts!  The instructions online were easy to follow and now my girls dolls can enjoy some cupcakes and treats!

Pink, pink, pink

As a stationery fan I absolutely love this flamingo pen, it looks very sweet!  I painted my nails pink to match it and then used the cute nails stickers to really kawaii-fy the look.

My kawaii nails

Pink, glitter and unicorns... oh my!  All my favourite things!

If you want to win a Kawaii box for yourself then you can enter here!  The more steps you take the more entries you will get.

Monday 9 July 2018

Artline Monday - *Summer Activities* Design your own bag

The summer break starts in two weeks so I think I will be sharing a few summer activities you can do over the holidays here on the blog.  If you don't have children but love arts and crafts then of course you can join in too and make your projects as simple or complicated as you like.  

For today's post I have made a summer tote/beach bag using some Artline fabric markers.

Summer beach bag

You can buy plain cotton bags like this one for a pound on eBay or if you have any promotional reusable bags they are usually blank on the reverse so you could draw your design on that side instead.

Plain cotton bag and Artline fabric markers

The best thing about these fabric markers is that the ink fixes to the material without you having to iron over them so once you have finished creating your bag it is ready to use!  The pens come in white, pastel pink, pastel blue, pastel green and pastel orange and they work great on coloured fabrics too so you don't have to stick with whites and creams. 

If you can't think of a design you want to do here are some ideas to get you started, repeating patterns, personalise with your name, your favourite quote, doodles or draw your favourite character from a TV show or film.

Starting my design

Before you use the markers you need to give them a good shake, this is always my youngest daughter's job!  


Finishing the outline

I drew the outline of my word first and then went back to fill the letters in afterwards.  The markers are really simple to use and have a bullet style nib which gives you a very precise line of colour as you write, draw and colour in with them.

Filling in the letters

Once I had finished my word I decided it still looked a little plain so I added a couple of flowers to the design in opposite corners of the bag.  

Adding some flowers

Again I grew the outline of the flowers first and then coloured them in.  Doing it this ways means if you make a mistake you have more options available to try and fix it like making your drawing bigger or colouring over the error.

Finished and ready to use

If you find the ink feels like it isn't flowing as well as you would like while you are using the markers then just push down on the nib using the pen to release more ink and you'll be good to go!

As I said before once you have completed your design the ink is set to the fabric so you don't have to get the iron out, which is great because I hate ironing especially in this weather!

All set for summer

If you enjoyed making your own beach bag then you could have a go at personalising a pair of canvas shoes or trainers, creating a t-shirt or top or adding your own bit of flair to different types of clothing.  I really want to buy a pair of black canvas shoes and add a splash of colour to them!  If I do I will have to show you how they turn out!